Production line sand table model making factory
Case study of sand table model production for assembly line
Project Background
This model replicates the SMT (Surface Mount Technology) production line of an electronic factory, focusing on the core process of "motherboard solder paste printing, surface mounting, and reflow soldering", with a target restoration rate of 90%. The model needs to present equipment layout, operation flow, material flow logic, while also considering visual authenticity and process details.
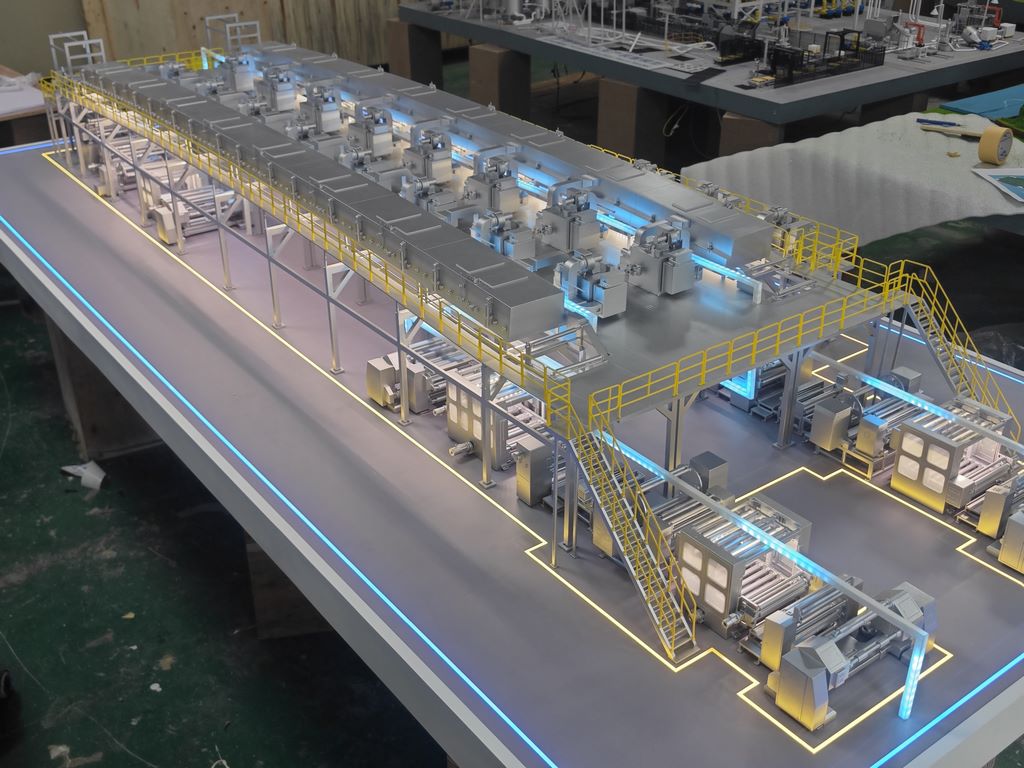
1、 Material selection: "Low cost authenticity" close to industrial texture
The core principle of model materials is "easy processing+strong imitation", avoiding expensive industrial simulation materials and balancing cost and effectiveness:
Chassis and frame: 1.5cm thick PVC board (light gray), lightweight and easy to cut, surface can be painted to simulate industrial flooring;
Main equipment: Key components such as surface mount machines and reflow soldering furnaces are made of 3D printed parts (PLA material, white substrate) with an accuracy of 0.5mm, restoring the edges and details of the equipment casing and heat dissipation holes; Auxiliary structures (such as brackets and guide rails) are laser cut with 2mm thick acrylic sheets, and the edges are polished to be free of burrs;
Conveyor belt system: transparent silicone strip (simulated synchronous belt)+black rubber pad (simulated roller), the silicone strip can be bent to fit the curvature of the track, and the rubber pad is cut with a utility knife to create a toothed pattern;
Detail completion: The circuit is made of 0.1mm fine copper wire (dipped in tin to prevent oxidation), the operation buttons are covered with miniature circular stickers (diameter 3mm, red/green/yellow colors), and the identification plates are cut from thin wooden sheets (1mm) and handwritten printed.
2、 Production process: layered construction from "framework" to "soul"
Chassis and Scene Base
Draw a chassis drawing at a scale of 1:50 (length 120cm x width 60cm), and use wooden keel (2cm x 2cm pine square) as internal support to ensure stable load-bearing. First, apply epoxy primer (gray) to the surface of the chassis. After it dries, cover it with self spray paint with a cement like texture (dark gray+light gray gradient). Dip a sponge into a small amount of white paint and lightly tap it to simulate the feeling of small particles on the floor.
Equipment module construction
SMT machine: After 3D printing the shell, use a carving knife to correct the details (such as digging grooves in the display area of the operation panel and embedding 0.5mm thick transparent acrylic sheet to simulate screen reflection); Stick imitation metal stickers (silver gray with slight scratches) on the side of the body to enhance the industrial feel.
Reflow soldering furnace: Cut the acrylic sheet into a rectangular frame (80cm in length, 30cm in width, and 40cm in height), wrap it with a thin layer of aluminum foil (pasted with white glue), and simulate the luster of the stainless steel shell; The furnace door is connected by a magnetic attraction hinge (micro strong magnetic), which can open and close to display the internal heating tube (thin copper wire wound in a spiral shape, coated with red acrylic to simulate high temperature zone).
Conveyor belt bracket: The acrylic board is cut into an "H" - shaped column (15cm high), and the bottom is fixed in the preset position on the chassis with AB glue. The top crossbeam is welded with PVC strip (3mm wide) (reinforced with hot melt adhesive and fine wire) to ensure the stability of supporting the conveyor belt.
Dynamic System Restore
The conveyor belt track is attached to the chassis with black electrical tape (aligned with the width of the equipment docking point), with silicone strips embedded in the track groove. Micro motors (1:200 scale toy car motors, hidden in the bracket) are connected at both ends, and the speed is controlled through a mobile app (low-speed simulation production rhythm). The roller is cut with a black hard rubber sheet (2mm thick), and a thin iron wire is inserted into the center hole as the shaft. Vaseline is applied to the contact area with the track to reduce friction and ensure smooth rotation.
3、 Post processing: using "color hierarchy" to awaken industrial texture
The key to the realism of a model lies in "de modeling", which simulates material properties through layered coloring:
Metal parts (such as equipment casings and brackets): First, spray light gray water to fill the soil (exposing minor defects), then use dark gray acrylic (diluted) to scan along the structural edges (simulating shadows), and finally use dry scanning method (a small amount of white acrylic+soft bristled pen lightly sweeping the edges) to enhance the highlight and create a "cold hard metal" texture.
Plastic parts (such as operation panels and buttons): Use a light beige acrylic base (simulating ABS plastic), dry it and spray it with a transparent gloss paint (diluted to 1:3) as a whole, and apply dark acrylic (simulating wear) to some areas (such as button depressions) to increase "use marks".
Rubber parts (such as rollers and conveyor belts): Mix dark gray with a small amount of black acrylic to create a matte color (add 10% talcum powder to reduce glossiness), evenly apply 2-3 layers, and simulate the "soft matte" characteristics of rubber.
Scene atmosphere: Spray a small amount of dark brown acrylic (diluted) on the floor, use a cotton swab to dip and wipe the "equipment base projection area" to simulate long-term oil stains; Paste micro green simulated grass (0.5cm high) between equipment gaps to restore local greenery in the workshop.


